Icons may be dragged from GConvert and dropped directly onto external applications like Windows Explorer, Microsoft Word, image processing tools...
Several possibilities:
- you do not need to use the Save As dialog, navigate to the folder and specify a filename for the output file.
- if the target application accepts bitmap drag/drop, then you do not even need to save the icon in an external file on your disk.
![]() To drag/drop an icon image, first select it in the Image Viewer and then double-click on it, or press CTRL+R. This will open the Icon Preview window as shown below:
To drag/drop an icon image, first select it in the Image Viewer and then double-click on it, or press CTRL+R. This will open the Icon Preview window as shown below:
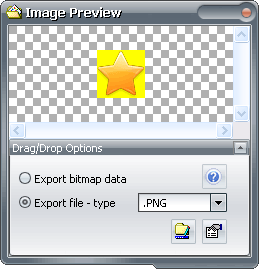
The icon image is displayed like if it was already converted. You can then drag this image from this window to the target application and then drop it. When a drag operation is started, the cursor automatically changes.
![]() GConvert supports two kinds of drag/drop: bitmap & file. The majority of applications only support file drag/drop; in that case you should use "Export file". This means GConvert must first save the icon as a file to a temporary location in the specified format. Then it passes the filename to the target application which will open the file.
GConvert supports two kinds of drag/drop: bitmap & file. The majority of applications only support file drag/drop; in that case you should use "Export file". This means GConvert must first save the icon as a file to a temporary location in the specified format. Then it passes the filename to the target application which will open the file.
You have to specify the format of the temporary file: it's the same list as when you click the Save button in GConvert.
You can also specify the filename for the output file by clicking on the small left button near "Temporary file only". You will be prompted to enter a new base name. This base name should not contain any extension and must contain the %u parameter. This parameter is automatically replaced by a number. Each time a new temporary file is created, this number is increased, so each new file does not overwrite a previous one.
Finally the second button (on the right) lets you configure the properties for the selected format, provided that this format supports additional conversion properties.
![]() If your target application supports bitmap drag/drops (like Microsoft Word), then you can use "Export bitmap data". In this case, no temporary file is created. The icon image is converted in a bitmap and this bitmap data is passed to the target application.
If your target application supports bitmap drag/drops (like Microsoft Word), then you can use "Export bitmap data". In this case, no temporary file is created. The icon image is converted in a bitmap and this bitmap data is passed to the target application.
Notes:
- you can expand or collapse the drag/drop options panel using the small button at the top-right.
- options are automatically saved and restored.
- drag/drop options may be affected by the UAC feature of Vista.