GConvert features its own internal icon editor: although this is not a true image editor (you have not the traditional paint tools such as pen, circle, etc... yet) because you probably already have advanced imaging tools, the icon editor provides you with some interesting functions like importing existing image files, generating icon images, etc... Below is the description about how our icon image editor works.
![]() To open the icon editor, there are several direct and indirect ways:
To open the icon editor, there are several direct and indirect ways:
- when an icon is selected in the Main Viewer, you can double-click it, press Edit in the toolbar, press CTRL+E or finally select "Edition|Edit Icon" menu command (or the same but in the mouse context menu)
- use the "File|Convert picture to icon" menu command; once you select an image file, the icon editor will be displayed.
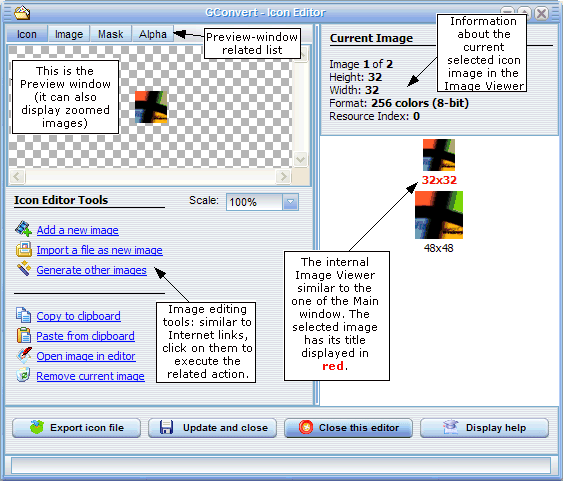
![]() On the following screenshot you can see the 4 important items of the icon editor:
On the following screenshot you can see the 4 important items of the icon editor:
the Image Viewer (right). It lists all icon images available in the edited icon; it is similar to the Image Viewer of the Main window. When you want to edit an icon image, you will first need to select it in this list.
the Image information panel (top-right). It indicates important properties about the selected icon image such as size and color depth.
the Preview window (top-left). It displays the current image selected in the Image Viewer. It supports displaying several items: using the "Preview-window related" list of tabs, you can change what the preview window should display; see below for further information.
Finally the image editing tools (bottom-left). There are several Internet-like links that will execute actions such as adding new image icons, saving icon file, etc... You will always click these links to execute the different actions you want.
About what you can see with the Preview window
The Preview window offers several views of the selected icon image. These views may be selected using the four tabs at the top. To switch to another view, just click the desired tab. There are four different views available:
- Icon (default): displays the icon image as it would appear in Windows.
- Image: displays the color bitmap of the icon image (bitmapped image without the mask).
- Mask: displays the mask bitmap of the icon image if available.
- Alpha (for 32-bit icon images only): displays the alpha channel of the 32-bit icon image. If no alpha is available, nothing is displayed.
You can set the scale for the preview window.
Note that the current view mode does not interfere with other image editing tools such as copy to clipboard.
Describing the icon image editing tools
Just select the item you would like more information about:
- Add a new image
- Import a picture as image
- Generate other images
- Copy to clipboard
- Paste from clipboard
- Open image in editor
- Remove current image
- Export icon file
- Update and close
- Close this editor
This link lets you save the current edited icon to a Windows icon file (.ico file). This icon file can be then read by GConvert.
If the icon is issued from an icon library, note that this will not update the icon nor save changes back to the icon library: use "Update and Close" link.
This link causes the icon to be saved back to the icon library or saved to a Windows icon file (if you are converting a picture to an icon for instance). Then the icon editor is closed and the result is then immediately visible in GConvert's main window.
Cancels all changes and returns to GConvert's main window. Note that if you have modified the icon and you click this link, you will be asked to confirm whether you really want to cancel your changes.
In future versions of GConvert, we will continue to improve the icon editor and add new features & possibilities. Do not hesitate to send us your feedback/comments/suggestions.
Enable/disable PNG compression (Vista-compatible icons)
A "PNG Compressed" command lets you enable or disable PNG compression for icon images. Icons in Windows Vista can be PNG-compressed to make them smaller, but in that case, they are not backward-compatible with previous versions of Windows (like XP).
![]()
To turn on PNG compression, click the "False" option and select "Enable PNG compression". And vice-versa.
![]()