Below you will find a description of the common operations you may do in GConvert; there are also other operations which have separate topics.
| Open a file | Copy an icon to clipboard | Edit an icon |
| Preview an icon image prior saving/copying | Drag/drop icons | Show icon properties |
| Save a single icon | Set background color | Convert current file to icon library |
Open a file

![]() First you need to select a file that contains icon resources; you have several means to open a file in GConvert:
First you need to select a file that contains icon resources; you have several means to open a file in GConvert:
- Choose the "File" menu and then select "Open". You can also reload a file listed in the Most Recent File list under the File menu.
- Use the "Open" button in the toolbar.
- Select an icon favorite from the Favorites window by clicking on the Favorites button.
- Use the command line when launching GConvert: for example, GCONVERT.EXE "c:\my documents\MYLIB.ICL"
- Drag/drop a file from Windows Explorer onto GConvert's main window.
- Use the shell context menu command from Windows Explorer: "Open with GConvert" (when available).
The default shell open dialog box (screenshot on right) was extended and displays two additional items on the right side:
- at the top there is the "My Favorite Paths" button. click this button to access to your favorite directories. When you select a favorite directory, the current folder will be automatically set to this favorite path. Finally to add the current folder to to the favorite list, just select "Add current folder...".
You can also manage your favorite paths in the Environment Options.
- at the bottom there is the "Show/Hide Icon Preview" button. When it is toggled on, a preview list is available and will show you icons available in the file that you select. If you do not want to display the preview list (it may take time and memory when previewing large icon libraries for example), you can disable it by pressing the associated button again.
![]() After you selected your icon source file, GConvert will read it and display icons in the Main Viewer. click an icon in the Main Viewer to see its icon images in the Image Viewer. Note that a progress bar will indicate you the loading status; GConvert must first read and store icons into memory before drawing them.
After you selected your icon source file, GConvert will read it and display icons in the Main Viewer. click an icon in the Main Viewer to see its icon images in the Image Viewer. Note that a progress bar will indicate you the loading status; GConvert must first read and store icons into memory before drawing them.
Preview an icon image prior saving/copying
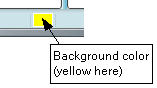
You can open the Preview Window by double-clicking on an icon image displayed in the Image Viewer, or by selecting the "Show Preview Window" menu command under the "Edition" menu (or CTRL+R) or the context menu. The Preview window displays the icon as it would appear once the conversion is performed. The background color (on the screenshot below, it was yellow) can be changed as described below.
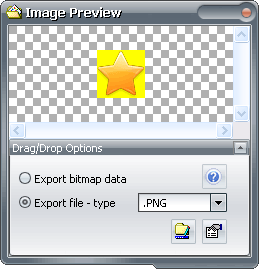
![]() The Preview Window also provides you with the possibility to drag and drop icons directly onto other applications. How to drag & drop icons.
The Preview Window also provides you with the possibility to drag and drop icons directly onto other applications. How to drag & drop icons.
Save a single icon
First in the Main Viewer list you need to select the icon containing the icon image you want to save. Then choose the right icon image in the Image Viewer and after that you can:
- click the "Save" button and then choose the destination format in the list.
- click "File" menu, select "Save As" and the destination format in the list.
- click with the right button to show the context menu and select "Save Icon".

» More information about saving single icons & destination formats
Copy an icon
After you selected the icon image you would like to copy to the clipboard, you can:
- click the "Copy" button in the toolbar.
- click "Edit" menu and select the "Copy to clipboard" command.
- click with the right button to show the context menu and select "Copy to clipboard".
- press CTRL+C keystroke.
Drag/drop icons
You can drag/drop icons directly into external applications from GConvert. Traditional applications like Windows Explorer, Microsoft Office, Internet Explorer and some image processing tools can accept file & bitmap drops.
![]() First select the icon image you want to drop in another application, then you can either:
First select the icon image you want to drop in another application, then you can either:
- double-click it in the Image Viewer
- or select the "Show Preview Window" menu command under the "Edition" menu or the context menu.
![]() The Preview Window is displayed; you can configure the drag/drop options as explained in this topic or directly drag the displayed icon image (the mouse cursor should be changed) and drop it in the application you want.
The Preview Window is displayed; you can configure the drag/drop options as explained in this topic or directly drag the displayed icon image (the mouse cursor should be changed) and drop it in the application you want.
Example: on the screenshot above, GConvert will export the image as a PNG file. Just drag the file and drop it in a folder: the PNG file is automatically created in that folder.
There are two drag/drop formats supported by GConvert: bitmap & file. The choice depends on whether the target application supports the format or not. Generally you will use the "Export file" option (supported by Windows Explorer and other general applications for instance).
Set background color
Icons are transparent (see 'what is an icon?') and when converting an icon to another format, this transparency cannot generally be maintained. So it is replaced by a background color: transparent areas are filled with this background color. You can change this color using the "Color" button or the menu command: "Edition|Set Background Color" or finally by double-clicking on the background color itself in the status bar.
![]() You can also pick any color of your screen with the Screen Color Picker tool.
You can also pick any color of your screen with the Screen Color Picker tool.
Notes:
- The background color is displayed in the status bar and is automatically saved/restored.
- Some image formats also support transparency (including alpha blending) like GIF or especially PNG (Portable Network Graphic) formats. When saving to these formats, GConvert will automatically set the transparency color of the image to the background color, so the picture will appear transparent like icons.
For 32-bit icons, the alpha channel will also be used as transparency reference (especially with 32-bit bitmaps and PNG files). - If you convert an icon image to a format like GIF (which is limited to 256 colors), GConvert generally automatically creates a palette color. However if this icon image already has a palette, the latter will be kept during the conversion: consequently your background color should be in this palette. If this is not the case, then you may be prompted about what GConvert should do (see the Environment Options help topic).
Edit an icon
GConvert features its own icon editor that lets you edit the images of your icons, change their properties and much more. Just select an icon in the Main Viewer list and double-click it. You can also press the Edit tool button, press CTRL+E or finally click "Edition|Edit Icon" menu command.
![]() The icon editor has its own help topic so click here to read furthermore about it.
The icon editor has its own help topic so click here to read furthermore about it.
Show icon properties
Even if the Image Viewer already displays the majority of the image information items like the icon image's size, you may see additional properties of the selected icon using Show Icon Properties (or right click the image in the Image Viewer). The Properties dialog box will show you the image including its information like color depth, height, width, icon resource name and index:

![]() For icon images that include a color palette (up to 8-bit icon images), GConvert can display the list of colors in this palette. Just click "View the color palette":
For icon images that include a color palette (up to 8-bit icon images), GConvert can display the list of colors in this palette. Just click "View the color palette":

![]() For Vista icons, it tells you whether the selected icon image was PNG-compressed or not.
For Vista icons, it tells you whether the selected icon image was PNG-compressed or not.
![]() Finally it will also display the color, the mask bitmap and eventually the alpha channel bitmap (for 32-bit icon images). You can optionally copy them to the clipboard.
Finally it will also display the color, the mask bitmap and eventually the alpha channel bitmap (for 32-bit icon images). You can optionally copy them to the clipboard.
Open external icon editor
Sometimes the internal icon editor will not be enough so you can edit the selected icon with your own icon editor program: GConvert will extract the icon to the Windows temporary folder and then launch your default icon editor (before using this command, you must have defined your own default icon editor in the Environment options).
This command is available by selecting "Edition|Open external icon editor" menu.
Convert current file to icon library
If the current opened file is not already in the icon library format (ICL), then GConvert lets you convert the loaded file into a standard icon library. Icon libraries are useful for icon storage as they are compatible with Windows.
When the option is available, select "Library" then "Convert current file to icon library". You will be asked for the filename of the new library; note that the new library will not be immediately opened in GConvert, you will have to use "Open".
GConvert always converts to 32-bit icon libraries. If you want to make an old 16-bit icon library, select "Library" then "Save library (16-bit) as".
![]() Take a look at the "Managing icon libraries" help topic.
Take a look at the "Managing icon libraries" help topic.
Using the other tools
GConvert provides you with several tools called "experts" which can assist you in advanced operations such as creating icons from images, exporting icons to a Web page, browsing your system for icons, batch create icons, modifying icons in EXE/DLL, etc...