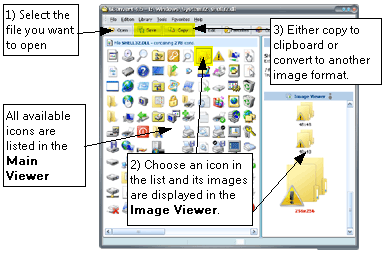
First in the Main Viewer list you need to select the icon containing the icon image you want to save. Then choose the right icon image in the Image Viewer and after that you can:
- click the "Save" button and then choose the destination format in the list.
- choose "File", select "Save As" and the destination format in the list.
- click with the right button to show the context menu and select "Save Icon".

About selecting the destination format
A popup menu will list all destination formats available. GConvert natively supports exporting icon images to icon files (.ico), bitmaps (.bmp), Portable Network Graphic files (.png) and Adobe Photoshop files (.psd). Thanks to plug-ins, this list can be widely extended (with GIF, JPG support, etc...).
All you have to do is first to select the destination format you wish and then the shell save dialog box will be displayed, asking you for the filename of the output file:

Properties for the conversion
![]() The Save As dialog box may include additional items on the right side (like options to configure the conversion). The "My Favorite Paths" button will always be there, so you can select a favorite path in the list where to save the converted icon.
The Save As dialog box may include additional items on the right side (like options to configure the conversion). The "My Favorite Paths" button will always be there, so you can select a favorite path in the list where to save the converted icon.
- If you export the selected icon to an icon file (.ico), there are 4 additional options named "Icon Export Options":
1) Save all images in one icon file (.ico): this option ignores the current icon image selected in the Image Viewer and will export all of the icon images from the selected icon in the Main Viewer. In other words, the entire icon resource is exported to an icon file. Generally recommended.
2) Only save current selected icon image: only the current icon image selected in the Image Viewer will be exported as an icon file. Consequently the exported icon file will contain only one image.
3) Save all images in separate icon files: this option ignores the current icon image selected in the Image Viewer and will export all of the icon images from the selected icon in the Main Viewer to different icon files. In other words, the entire icon resource is exported to several icon files, each icon image will be saved in a separate icon file. The icon filenames are based on the filename you enter plus the resource index of the icon image.
4) Remove PNG compression if used: please see this topic.
- If you export the selected icon to a bitmap file (.bmp), there are 2 additional options named "Bitmap Export Options":
1) Always export 24-bit bitmaps (high colors): whatever the color depth of the current icon image selected in the Image Viewer is, the icon image is always converted to a 24-bit bitmap (16.8M colors) so you are sure the bitmap will always appear correctly (no palette problems).
2) Use the color format of the exported icon: the bitmap will have the same pixel format as the current icon image selected in the Image Viewer. Note that this may vary from 1-bit (black&white) to real 32-bit bitmaps (with alpha channel). This option is recommended as it can create smaller bitmap files.
Note about 32-bit icons: if you want to save your 32-bit icon images to 32-bit bitmaps, enable the "Use the color format of the exported icon" option. In this case, GConvert will embed the alpha channel of the 32-bit icon image into the 32-bit bitmap. Some bitmap editors do not support 32-bit bitmaps, although they are supported by Windows XP. Finally GConvert can import alpha channels from 32-bit bitmaps too when converting a picture to an icon.
- If you export the selected icon to a Portable Network Graphic file (.png), there are several additional options named "PNG Export Options":
1) Compression level: .png files support lossless compression thanks to zlib (similar to Zip deflate algorithm). This field lets you change the compression level (0: no compression to 9: best compression). Of course high levels of compression may slow the loading process of your png files on the Web (the decompression phase requires more time) but make png files smaller.
2) Include Transparency: .png files support transparency (partial-transparency and bit-transparency). When this option is enabled, GConvert will try to include transparency in the png file. If the icon image contains an alpha channel, then the PNG image will include an alpha channel too (partial transparency); otherwise "bit transparency" is used (one color is designed as transparent, like in icons).
3) Create a 8-bit PNG: useful for the web, 8-bit PNG are smaller as they use a palette of 256 colors. They can be transparent too (except that they cannot contain an alpha channel: bit transparency is then used). If your icon image has more than 256 colors (24-bit and higher), then a color transformation will be first applied using the settings defined in the Environment Options.
If this option is disabled, a 24-bit png is created (true colors).
- If you export the selected icon to an Adobe Photoshop (.psd) file, there is no special option.
Notes:
- If you want to export 32-bit icon images, the best format remains 24-bit PNG (alpha channel) or even Adobe Photoshop PSD. The majority of PNG-compatible image editors will easily recognize alpha channels. You can also try 32-bit bitmaps too under Windows XP. Internet Explorer 7 and FireFox recognizes alpha channels in PNGs (Internet Explorer 6.0 doesn't).
- Some plug-ins may also provide you with options regarding the conversion to their format. These options can be accessed using the "Configure" button on the shell save dialog box, when some options are available. Otherwise no button will be visible.