
 GConvert
Import picture as icon
You can import an existing picture file as a new icon image. When you select "File|Convert picture to icon" or in the icon editor, you click "Import a picture as image", you are prompted to select the picture file you want to import.
GConvert natively supports importing icon files (.ico), bitmaps (.bmp), Portable Network Graphic files (.png), Adobe® Photoshop® files (.psd), Macintosh® icon files (.rsrc & .icns), mouse cursor files (.cur). Thanks to plug-ins, several other image formats may be imported too, like GIF and JPEG.
When you have selected your file and confirmed your choice, GConvert will load it and then display the following large window called "Import Picture":
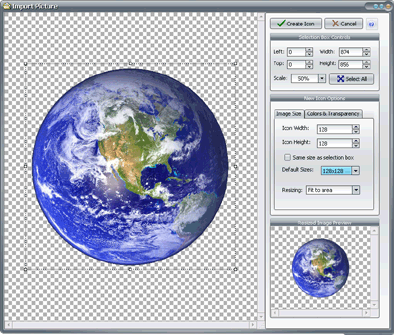
First of all, you can see the imported image on the left in the white area. There is a rectangle with small boxes which indicates the current image selection. This rectangle may be moved and resized using the small boxes at the different corners. If these corners are not visible, just click the picture to give them the focus.
On the right, there are three option boxes and two buttons which are Create Icon and Cancel. Pressing Create Icon actually causes GConvert to import the portion of the image selected inside the rectangle and to convert it to the new icon image.
The "Selection Box Controls" box contains four fields, a button and the view scale. The two fields on the left contains the two coordinates (x,y) of the left-top corner of the selection rectangle. The two remaining fields on the right contains the width and the height of the selection rectangle. All of these four fields are in pixels. You can manually enter the numbers (integers only) directly in the four fields or use the rectangle box to adjust the selection. Note that the values of the fields are automatically updated.
Press the "Select All" button to automatically adjust the rectangle selection to the size of the imported image. By default GConvert will always adjust the selection to the size of the imported image.
The "Scale" come box lets you set the scale of the image viewer. It is especially useful if you want to import a small part of a large picture for instance.
The "New Icon Options" box offers you several options regarding the new icon image which is about to be created. It is divided into two tabs:
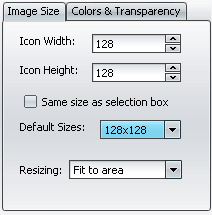
The Image Size tab lets you define the size of the new icon image & how the imported image will be copied/resized in order to fit the new icon dimensions:
-
Icon width & icon height: these two fields indicate the size in pixels of the future icon image.
-
Default Sizes: this combo box contains some pre-defined icon sizes. Just click the list to select the size that you like.
-
Same size as selection box: if this option is enabled, then the two fields will be linked with the height & width fields of the selection red rectangle seen above. In this case the new icon image size will be automatically adjusted when you resize the selection.
-
Resizing: defines the method to resize the picture when the selection's size is not equal to the future icon image's size:
-
Center: the selection will be centered in the new icon image.
-
Crop: the selection is placed at the top-left corner of the new icon image.
-
Fit to area: the selection is resized to exactly fit the size of the new icon image. You can select the resample image filter that is used in the Environment Options.
If the selection is smaller than the new icon image (and when not resized), the remaining parts will be replaced with the transparent color (so they will look transparent in the final icon result).
-
When the Image Size tab is active, the last box called "Resized Image Preview" shows you the image after it was resized or copied according to your settings. It's not a preview of your icon as no color transformation was applied at this time.
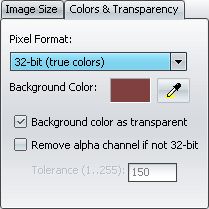
After that, you switch to the Colors & Transparency tab. You can configure the color depth of your future icon image & how GConvert will apply some color transformations if necessary.
-
Pixel Format: defines the color depth of the new icon image. Generally 32-bit or 24-bit icons should be created with imported pictures; actually select the pixel format according to the color depth of the imported picture. For example, if you import a GIF file, then you can easily leave the pixel format to 8-bit since GIF files can only contain up to 256 colors.
Note that GConvert will apply necessary color transformations itself when necessary.
-
Background Color: defines the color that will be used to fill in the background; you can visually select the color to set as background one using the dropper
 : click the pixel of the image you want its color to become the one of the background. Note that the cursor is first automatically moved near the selection: the last box will automatically display the resized image (before a color transformation is applied) so you can select a color from the original image.
-
Background color as transparent: when this option is turned on, the background color is used to generate the mask for the icon image. This should be a color belonging to the picture (generally select the color of a pixel of the background, at the bottom-left corner of the picture for example); this color will be set as transparent in the icon, consequently each pixel with this color will appear transparent too.
If turned off, you will get a non-transparent icon.
-
Remove alpha channel if not 32-bit: if you set the pixel format (see above) to 32-bit, then the new icon image will have an alpha channel. However if the imported image has an alpha channel (like other icons, PNG, PSD & 32-bit bitmaps) and that you want to create an icon image whose pixel format is not 32-bit, the alpha channel should be removed. Turn this option on and GConvert will remove the alpha channel using the specified tolerance.
If turned off, some pixels in the new icon will have colors similar to the background color specified above.
You should turn off this option only if you also turned off the previous option.
-
Tolerance (1..255): this field is enabled only if the previous option is turned on. The tolerance helps GConvert to determine whether the semi-transparent pixels of the 32-bit image should be fully transparent or not in the new icon image. Thus the conversion quality should be better.
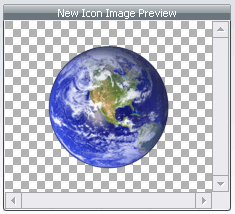
When the Colors & Transparency tab is active, the new icon image is shown in the preview box. This is a real preview of the new icon image as it will appear once it has been created:
Finally press "Create Icon" to continue. The new icon image will be created according to your options and then placed in the icon currently edited in the icon editor.